
Knife throwing is far from a new fad. People have been throwing knives or similarly sharp objects for centuries, either for combat, hunting, or sport. There’s no denying that chucking a blade has its definite (although limited) advantages in survival situations. A good example would be hunting for small prey, such as rabbits.
Whatever your aspirations for practicing how to throw a throwing knife are, you should always do it properly and safely. And that’s precisely what you will learn in this guide. We will cover what kind of knife works best for throwing, the best targets for practice, where to throw, and the various grips and throwing techniques.
Before we get to the throwing itself, you need to make sure you have the right tools and a safe environment for using them. That way nobody winds up injured. Thus, we’ll start from the foremost point — what knife you should be throwing.
Choosing the Knife
Obviously, you need to get a hold of throwing knives since, as you can see from their name, they’re crafted for exactly that function. Seeing that regular blades don’t have the balancing necessary for accurate throws, you would be far better off using specialized tools. You can practice with butter knives or cutting blades, but it’s difficult because different knives feel and throw differently. More importantly, handling a razor-sharp blade when you haven’t even mastered the basics of throwing is just begging for trouble.
What a Perfect Throwing Knife Looks Like
So what kind of blade do we require? The ideal throwing knife has to cover the following:
- The edges need to be dull. People apply different techniques when doing their tosses. Some throw holding the handle, while others grasp the blade. For the latter, it would be quite unpleasant to cut themselves with each toss. This is why proper throwing knives have dull edges.
- It needs to have a sharp point. This one doesn’t require much explaining. Naturally, your knife should stick into your target. That’s the point (get it?), after all.
- It should have rounded corners. As the knife travels through the air, the resistance it encounters could easily push it off its trajectory. That’s the reason your knife should have an aerodynamic shape. And smooth edges are optimal for that purpose.
- It needs to have some thickness. Once the knife lands on (or in, rather) its target, all that momentum it has been carrying suddenly stops. That inertial force can easily bend knives. A thicker blade will more likely withstand these forces. A knife too thick can weigh too much, though, so bigger isn’t always better.
- The fewer cutouts, the better. Cutouts exist to make a blade lighter. Have too many, though, and they might get in the way of that aerodynamics point from earlier.
- It ought to have a smooth, simple handle/grip. For those that hurl their blade from the handle, their grip needs to be as simple as possible. A fancy-looking grip may look cool, but it will always snag on your hand when releasing it. That means poor accuracy.
- It should measure at least 12 inches and 10–12 ounces. This seems to be the optimal length and weight for a throwing blade. So look for something in that ballpark.
Where to Get Throwing Knives
Oftentimes, you’ll find a weapons shop that sells blades explicitly meant for throwing. If you have no such establishment in your vicinity, don’t worry, there are alternatives. You can come across dozens of places or people online who will gladly sell their knives to you. They usually come in sets of three.
You need a finely balanced knife in order to have a stable trajectory upon hurling. Judging by that, as well as by factors like weight, it is tricky when shopping online. The best solution would be to buy products made by well-respected companies. Perfect Point, Smith & Wesson, and United Cutlery are among those you can rely on for quality.
Finding a Target
Now that you have the weaponry, the next point on your list is something to use it on. For your target, you’ll require something wide, so that you can hit it with a degree of consistency. As far as materials go, wood presents the best option. You want softwoods, such as Poplar, Cottonwood, or Pine. Harder ones like plywood or oak will have your knives bouncing off in most cases.
With all this in mind, a perfect target would be a log or a large board. You can get a hold of these in a few ways. The most convenient would be at a firewood dealer’s or a lumberyard. If neither works for you, maybe you can turn to a friend that chops lumber or cuts down a tree for one reason or another.
Finding a Place for Practice
So you’ve got knives, and you’ve got a target. But where to practice? Whenever you do your throwing, make sure it’s on an open, empty plain, be it a field or your backyard. There are a few reasons for requiring this kind of location:
- When you throw a knife that doesn’t hit the target, it will most likely fly off behind it. If you’re in a forest or field with tall grass, finding this stray blade is a pain. Meanwhile, on a meadow, the knife sticks out like a sore thumb most of the time.
- People are less likely to be there, so you don’t run the risk of hitting someone or their property.
- If you’re on a large open field, everyone can plainly see you from far away and know what you’re doing, so they know to be careful while nearby. Nevertheless, you should notify others when and where you plan on practicing.
Throwing Stance
While throwing, your body needs to be relaxed. Stand up straight, while maintaining a slight bend at the knees. Your right foot should stand a little ahead of your body. However, the left one should be planted forward if you throw with your left hand. Stances vary from person to person, depending on what they feel the most comfortable with. You’ll also find your optimal position in time and with enough practice.
Technique: Hold the Grip or the Edge?

Whether you hurl the weapon holding the knife by the blade or the grip depends largely on its balancing. As a rule of thumb, you ought to toss the heavy end first. So, if the edge is heavy, hold the knife by the handle, and vice-versa. When handling your knife, check to see which end feels heavier before you start throwing.
Technique: How to Hold the Knife
Generally speaking, you want to grasp the knife a certain way to ensure a precise hurl. Your thumb, index, middle, and ring fingers do the work, while the pinky’s just along for the ride. The thumb rests on the weapon’s middle, while the other fingers curl around its end. Grip the knife with a bit of force, but don’t hold too tight, and don’t let the wrist wobble. To be sure, what feels right depends on the person holding the knife, so adjust your grip as needed.
There are a couple of well-established grip variants you can work on mastering:
- Slider grip. The knife faces in the same direction of the line your middle finger makes with the hand. The knife rests snuggly between your outstretched fingers and your thumb, which crosses the grip. Great for throwing blades with sharp edges.
- McEvoy grip. The knife rests in a vertical position, related to your arm and hand. The fingers wrap the weapon, while the thumb goes around them, just like when you hold a hammer. Meanwhile, the thumb sits on the knife’s edge.
- Hammer grip. Very much similar to the McEvoy. One of the two main differences is that the weapon lies horizontal to your arm. The second is that your thumb goes on the blade’s side rather than the edge.
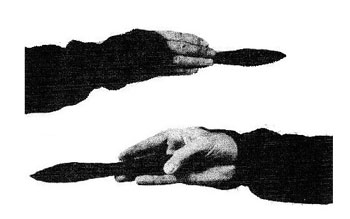
- Pinch grip. Your hand should form a loose fist, quite like when you’re handing someone a piece of paper (also similar to that strange gesture politicians do when holding speeches). The knife is between your thumb and the second knuckle of your curled index finger.
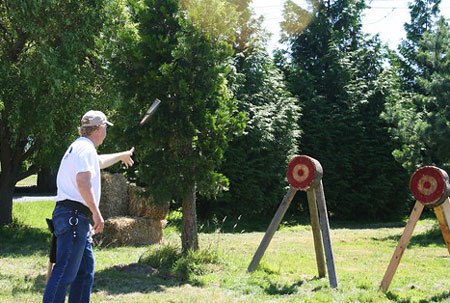
Technique: How to Throw
Once you’ve got your grip down, the time comes for you to hurl that knife! As mentioned before, your body must be relaxed. Square up your shoulders and bring your forward leg back a little. Move your throwing arm up over your head, with a small bend at the elbow. Then, swing the arm downward at the shoulder, maintaining a tight wrist. Release the knife and extend the hand in the throwing direction. The arm should continue its swing after the knife leaves the hand.
How to Tell You’re Throwing Properly
If you find that the knives you’re chucking keep hitting with the handle or don’t land straight, you may need to change the distance between you and your target. This is because the blade either spins too much or not enough to meet the target with its point. Simply relocate, try again with the same knife-throwing technique, and see what happens.
Under ideal conditions, the weapon should penetrate the target at a horizontal angle. If the knife sticks at an angle with the handle being higher than the point, the weapon has rotated too much mid-throw. The solution is to approach the target a little closer. Meanwhile, if the handle lies lower than the point, you may need to move away. This applies to throws while grasping the grip, so the opposite goes for edge-holders.
How Much Should the Blade Spin?
Theoretically speaking, the knife can spin as many times as you’d like, depending on the distance it travels. The most well-established and proven-to-work spin techniques, though, are the full-spin, no-spin, and half-spin.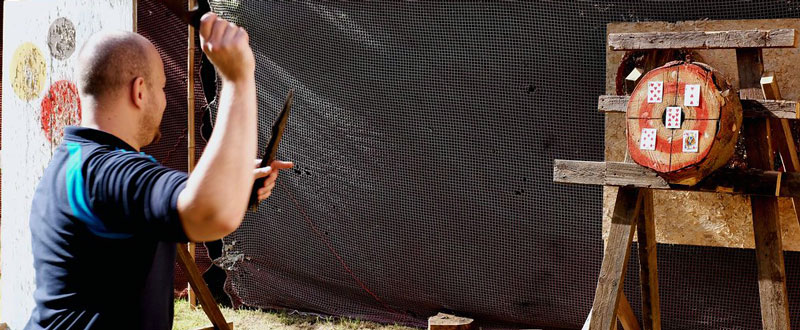
Half Spin
This is the most widespread technique in the knife-throwing community. When thrown this way, the knife spins half a circle (shocking, right?) before impact. You execute this move mostly like you read a little above. When throwing, don’t use too much force, and release when the weapon is in front of you. Don’t snap the wrist!
No Spin
To be a tad nitpicky, the blade does actually rotate during the no-spin throw — about three quarters. In accordance with your throwing distance with the half-spin method, you’ll probably want to practice this one half-way closer to the target. For the optimal hurl, use a knife balanced near the center. Please note that this technique is more advanced, so you ought to work your way up to taming it.
Here’s what you do. You grab the knife in the pinch grip, only with the index finger extended, rather than curled. Keep your grip as close to the weapon’s end as you can. Then, raise your hand until the blade tip of the knife points to the sky. Swing your hand downwards, stepping into your throw and bending at the shoulder instead of the elbow. Your swinging hand should wind up with the index finger pointed at the ground.
Full Spin
As you moved closer to the target for the no-spin, you should be farther away than on the half-spin. This time you should stand at twice the distance than the latter. In fact, your distance ought to be that plus your arm’s length. From there, proceed with the normal technique and adjust to your preferences.
Final Tips
This guide should prove sufficient to help you improve your throwing. From there on, only practice will allow you to master it. Before you go off on your own, a few more helpful tips should aid you in making your knife-throwing effective and safe.
- Always wipe your blade after practice. The sweat on your fingers can eventually corrode the metal it’s made of, eroding its effectiveness. Also, regularly file the knives to keep them sharp. A dull blade won’t be nearly as effective.
- Only throw when you know you’ll get the knife back. There’s little use in tossing your weapon and losing it for good. Hunting for small game is a good example of when it’s smart to throw.
- Don’t point the blade at people. They’re not toys, and they’re not chopsticks, so be responsible.
With all of this, you have the knowledge it takes to become an expert knife thrower. You’ll fumble a lot, and it may even feel frustrating, but with enough hard work, you’ll learn how to throw with great precision. Keep practicing, stay safe, and stay sharp!